Tuesday, July 28, 2015

Using Kerberos to authenticate Sitecore 8 to MongoDB 2.6 on Windows Server 2012

Overview

If you are configuring Sitecore 8 to authenticate against an on-premise MongoDB instance using Kerberos, you might run into issues getting the different environments in sync. In order to get them talking successfully, you need to be aware of the different settings to configure and how small missteps can cause communication failures.

This article will discuss some of those settings and possible issues you might encounter when running MongoDB 2.6 on Windows Server. Note that as of Sitecore 8.0u3, MongoDB 3.0 is not supported.


Configuring Kerberos

Before worrying about getting Sitecore to talk to MongoDB, it's important to verify you have Kerberos working correctly. Running through those steps is outside the scope of this article, but let's review the basic steps for getting Kerberos working on MongoDB:
  1. Create A-Records for your MongoDB host
  2. Create a service account to run MongoDB
  3. Create a root user in the $external database
  4. Install mongod.exe as a service
  5. Create a Service Principal Name for the service
  6. Configure the mongod.exe service to run using the service account
  7. Verify connectivity using mongo.exe

Configuring Users

Case sensitivity is very important both to MongoDB and to Kerberos. You need to make sure that you maintain the casing of your user when you configure Sitecore and when you configure MongoDB.

Let's first go through the places where a user is specified, then touch on what you need to know to configure each of them.

The places where you'll specify the user are:
  • AppPoolIdentity - The identity of the Application Pool that is running Sitecore
  • AuthenticatedUser - The user MongoDB sees when you connect (this will be the same user as the AppPoolIdentity, but it WILL be case sensitive)
  • ConnectionStringUser - The user you specify in your MongoDB connection strings
  • ExternalUser - The user who was created in the $external database and who has permissions to see the Sitecore databases


AppPoolIdentity

You have two options for who runs the Sitecore application pool. You can either leave it as Network Service, or you can set it to run as a domain user. The option you choose will impact how you configure Sitecore to talk to MongoDB.
  • Option 1 - You run Sitecore as a domain user.
    • e.g., SCKerberos@REALM.COM
  • Option 2 - You run Sitecore as Network Service
Note: Since IIS is not case sensitive, this setting is also not case sensitive.

AuthenticatedUser  
When you talk to MongoDB, you'll be doing it as a user. This user will be based on the SSPI principal and will be the case sensitive name of the AppPoolIdentity.

In the MongoDB logs, you'll see this log entry:
  • Option 1
    • [conn1] SSPI authenticated name: SCKerberos@REALM.COM
  • Option 2
    • [conn1] SSPI authenticated name: HOSTNAME$@REALM.COM
Note: This is case sensitive and will come from Active Directory.

ConnectionStringUser

In your connection strings, you'll specify the user who has permissions to access the MongoDB databases that Sitecore uses. The value you use here should match the AppPoolIdentity user.

Although you are running Sitecore as a specific user, you still need to pass the user in your connection string. In addition, you need to tell the MongoDB driver which authentication mechanism to use to authenticate the user.

Here is a connection string from ConnectionStrings.config for connecting to the analytics database on a server named "mongo.realm.com" that is running a standalone mongo instance. Note the use of "%40" to escape the "@" symbol, which is part of a Kerberos principal name, but is reserved in the MongoDB connection string.

  • Option 1:
<add name="analytics" connectionString="mongodb://SCKerberos%40REALM.COM@mongo.realm.com/analytics?authMechanism=GSSAPI"/>
  • Option 2
<add name="analytics" connectionString="mongodb://HOSTNAME$%40REALM.COM@mongo.realm.com/analytics?authMechanism=GSSAPI"/>

In the MongoDB logs, you'll see whatever value you set there in this log entry:
  • Option 1
    • [conn1] SSPI name provided by client: SCKerberos@REALM.COM
  • Option 1
    • [conn1] SSPI name provided by client: HOSTNAME$@REALM.COM 
Note: Since this user will be checked against the $external user list, it will be case sensitive

ExternalUser

You'll grant permissions in the $external database for Sitecore on any relevant databases. This user must match the name specified in your ConnectionStringUser.

Here are the commands you might use to create your users.

  • Option 1
use $external
db.createUser(
    {
        user: "SCKerberos@REALM.COM",
        roles:
        [
            { role: "readWrite", db: "analytics" },
            { role: "readWrite", db: "tracking_live" },
            { role: "readWrite", db: "tracking_history" },
            { role: "readWrite", db: "tracking_contact" }
        ]
    }
)
  • Option 2
use $external
db.createUser(
    {
        user: "HOSTNAME$@REALM.COM",
        roles:
        [
            { role: "readWrite", db: "analytics" },
            { role: "readWrite", db: "tracking_live" },
            { role: "readWrite", db: "tracking_history" },
            { role: "readWrite", db: "tracking_contact" }
        ]
    }
)

Note: This is case sensitive

Troubleshooting

When you attempt to connect, MongoDB will recognize the connection as coming from the AuthenticatedUser. It will then compare this to the ConnectionStringUser to make sure they match. If they match, it will then look for a user in the $external database that matches the AuthenticatedUser.

The default log level for MongoDB may not give enough details to find mismatches like this. You can increase the logging detail by specifying the --setParameter logLevel=5 option when you start up mongod.exe.

Here are some common issues:
  • If your AuthenticatedUser and ConnectionStringUser do not match, you'll see a log entry like this:
    • [conn1] GSSAPI authentication failed for sckerberos@REALM.COM on $external ; AuthenticationFailed SASL(-13): authentication failure: saslServerConnAuthorize: Requested identity not authenticated identity
  • If your AuthenticatedUser does not match the AuthenticatedUser, you'll see a log entry like this:
    • [conn1] auxpropMongoDBInternal failed to find privilege document: UserNotFound Could not find user SCKerberos@REALM.COM@$external
  • If you are using a replica set, you need to make sure your connection strings include it. Here's an example of a connection to the analytics database on a replica set using Kerberos:
    • <add name="analytics" connectionString="mongodb://SCKerberos%40REALM.COM@mongo1.realm.com,mongo2.realm.com/analytics?replicaSet=rsSitecore&amp;authMechanism=GSSAPI"/>

Other Considerations

While Kerberos does use SPNs, you will not need one for the Sitecore instance. Since Sitecore will be running as a user already, the ticket it creates will be based on that identity.

If you are using replica sets, you'll also need to use a keyfile since you will be running mongod.exe with the --auth flag.


Summary 

MongoDB can use Kerberos for authentication when working with Sitecore. However, it's important to make sure you pay attention to how you configure Sitecore. Something as simple as missing case sensitivity on a user in your connection string can be difficult to track down.

Friday, May 29, 2015

MediaFramework is not importing items in production

I have been working on a custom connector for Sitecore 8.0 to Adobe Scene7 that is built on MediaFramework 2.0. Unfortunately, we ran into a snag this week when deploying to production. The process, which will slowly ingest around 30,000 images and videos into our Sitecore instance, was not pulling anything in production, even though the process has successfully been tested in both Dev and QA.

In order to track the problem down, I started adding custom logging to our Synchronizers, starting with logging every method call that was made. What quickly became apparent was that our GetMediaData method on our custom synchronizer was never getting called in production, but it was being called in QA. Using this clue, I used ILSpy to crack open the assembly for MediaFramework to figure out what processor was making this call.

In the MediaSyncItemImport.CreateItem processor, in the Process method, you can see that GetMediaData is called, but only after a successful permissions check for Context.User against the Account Settings item.


Now we are getting somewhere - we are clearly failing a permissions check. But why?

The next round of logging I added was to see which user was running my import job, since the documentation for MediaFramework contains no mention of what user it runs as, or even how to configure that user.

Since I was seeing calls to GetRootItem in production, I added a line of code there to simulate the authentication check that MediaFramework was calling, as well as to log the results. Here is the code for my GetRootItem method:

public override Item GetRootItem(object entity, Item accountItem)
{
  Log.Info(string.Format("FolderSynchronizer GetRootItem Called. Looking for root item match: {0} from accountItem {1}", Scene7Constants.RootFolderFolder, accountItem.ID), this);
           
  Item rootItem = accountItem.Children.FirstOrDefault(i => i.Name == Scene7Constants.RootFolderFolder);
  Log.Info(string.Format("FolderSynchronizer GetRootItem Result: {0}", (rootItem != null ? rootItem.Name : "null")), this);
            
  bool canCreate = AuthorizationManager.IsAllowed(rootItem, AccessRight.ItemCreate, Context.User);
  Log.Info(string.Format("Permissions check for Item:{0}, AccessRight:{1} - {2} for user {3}", rootItem.Uri, AccessRight.ItemCreate, canCreate, Context.User.Name), this);

  return rootItem;
} 

When running this in dev, we saw that the user was "sitecore\admin", but in production it was "sitecore\anonymous". That explains the permissions problem. But how should we fix this?

You could grant permissions to the anonymous user in production, but that requires editing the raw values on the item because the security UI allow you to assign permissions to this user. In addition, this felt like a sloppy workaround.

To find a better solution to our problem, I wanted to know why we were running as anonymous in production but not QA. This ended up being a simple thing to determine - our security team disabled the admin account and it needed to stay disabled. In fact, we were supposed to have disabled it in QA!

Knowing this, I decided to dig a little further and figure out how we might control the user so we could have an account that had the correct permissions for MediaFramework, but still respected a least privileges configuration.

The answer again came from ILSpy. Specifically, knowing that Agents in Sitecore run as anonymous, there had to be some code in MediaFramework that was allowing it to run as admin.

The answer comes from Sitecore.MediaFramework.Schedulers.ScopeSchedulerBase. This class has two constructors, one of which takes a "database" parameter. But that constructor invokes another and passes it a userName. Here you can see the first constructor:


A little more digging shows that ScopeSchedulerBase.Execute() calls Sitecore.Security.Accounts.UserSwitcher to set the active user to the specified user.


Now that we know how the agent runs as the admin user, we just need to tell MediaFramework to use the other constructor for the scheduler.

The answer for this is not found in the MediaFramework integration guide, but it's as simple as passing another parameter to your agent in the config file. Just below the param that sets the database, you will add a new parameter that specifies the userName. Here is what your config file might look like now.

<scheduling>
  <agent name="MediaFramework_Scene7_Import" interval="00:01:00" type="Sitecore.Media.Scene7.Schedulers.Scene7ImportScheduler, Sitecore.Media.Scene7">
 <param desc="database">master</param>
 <param desc="userName">sitecore\scene7importer</param>
 <scopeConfigurations hint="raw:AddConfiguration">
   <add ref="mediaFramework/scopeExecuteConfigurations /*[@name='Scene7_Import_Content'][1]"/>
 </scopeConfigurations>
  </agent>
</scheduling>  

Thursday, February 12, 2015

Beginning Sitecore Development, Part 3 - Adding support for Twitter Bootstrap, Sublayouts and User Controls

Overview

This is part 3 of a series of posts on Beginning Sitecore Development in Sitecore 8. Knowledge of previous posts is assumed, so if you have trouble with any of the material here, you can refer back to the previous post at Beginning Sitecore Development, Part 2 - Building a Visual Studio Project.

Goals


In this post, we're going to extend our existing solution to add styling with Twitter Bootstrap 3.32. In addition, we'll add a sublayout so our editors will have flexibility in how they layout content. Finally, we'll add some custom controls to present content in a specific format to our users.

Adding support for Bootstrap


Our existing Visual Studio project has some structure already, but it could use a little more organization to support the new additions we plan to make. 

Here's the current layout of the solution.


Let's add a vendor subfolder to assets/MySitecore so we don't have to split up any 3rd party frameworks that might have their own asset folders.

Now download Bootstrap and unzip it to the assets/Mysitecore/vendor folder. Then add the Bootstrap files to your solution by setting your project to show all files and then including the folder. Your solution should now look like this:

When you are done, your solution should look like this:


With the Bootstrap files now available, let's update our HomeLayout to reference the appropriate styles and scripts, using relative paths. Let's also make a quick update to the content of our page to verify if Bootstrap is working correctly.


With all the proper hooks in place, it's time to test it out. Build and Publish in Visual Studio. Then go into Sitecore and preview your page again. You should see it is now leveraging Bootstrap.


Creating Sublayouts for Different Page Configurations


Now that we've got Bootstrap support, it'd be really great if we could offer several different configurations of the page. Let's create some sublayouts that support different column configurations.

Let's start by updating our layout page. We'll remove all of the Bootstrap test content we created and instead add Placeholders that represent the areas of the layout where a content editor can add sublayouts, controls, or renderings. We'll also add a hook for a new style sheet.

Here's our updated HomeLayout.aspx.


Let's go ahead and create our new stylesheet we just referenced. Create mysitecore.css under the assets/MySitecore/styles folder. Here we've set it up to contain some base styles we'll use with our sublayouts.


We'll now create a sublayout that provides for a two column configuration. Add a new control to the layouts/MySitecore/Sublayouts folder in Visual Studio named TwoColumn.ascx.


Our Visual Studio project should now look like this:


Open TwoColumn.ascx and add the Bootstrap styles to divide the page into two columns. Make sure to add Sitecore Placeholder controls so the content editors can organize content they add.


Go ahead and publish your solution.

Now we need to tell Sitecore about our new Sublayout. Find the /Layout/Sublayouts node in the content tree and then create a new Sublayout Folder named MySitecore. Create another Sublayout Folder inside of that one named Sublayouts.


Right click that folder and add a new Sublayout named TwoColumn and click Next


Place it in the appropriate location.


Select the file location that corresponds to our Visual Studio project. 

Note that we have the usual chicken-and-egg problem where Sitecore wants to provision a file that we want to publish with Visual Studio. If you did the step in Sitecore first, you'd be missing the new folder structure. However, if you did the step in Visual Studio first, the file will already be there and Sitecore will be unhappy. 

Just delete the file you already published at C:\inetpub\wwwroot\[Sitecore Instance]\Website\layouts\MySitecore\Sublayouts\TwoColumn.ascx, and click Create on the Sitecore wizard. This will create the Sitecore default version of the file. Then go back into Visual Studio and republish to get our customized version.

Creating a Custom Control


In order to test our Sublayout, we need something to put in it. We'll go ahead and create a very basic user control for this purpose.

Start by adding a new Web Forms User Control to the layouts/MySitecore/Controls folder in Visual Studio named CurrentTime.ascx.

Add a label to the user control that we can store the time in. Here's our file with the markup added.


Now add the code to store the current time in the label. Here's our code behind.


Go ahead and publish your solution.

Now we need to tell Sitecore about our new control. Find the /Layout/Sublayouts/MySitecore node in the content tree and then create a new Sublayout Folder named Controls. It should look like this now.


Right click that folder and add a new Sublayout named CurrentTime and click Next.


Place it in the appropriate location.


Select the file location that corresponds to our Visual Studio project. 


Yet again, we get our chicken and egg problem. Delete the C:\inetpub\wwwroot\[Sitecore Instance]\Website\layouts\MySitecore\Controls\CurrentTime.ascx file and click Create.

Your content tree should now look like this, with a CurrentTime control and a TwoColumn sublayout.


Republish your Visual Studio solution.

Testing the SubLayout and Control


Go to the content/My Home node that corresponds to our custom page. Click on the Presentation tab in the top menu, then the Details button.

Click edit under the Default device and then click on the Controls tab to the left.

Click the Add button. Navigate to the Sublayouts/MySitecore/Sublayouts folder and select the TwoColumn sublayout. For the Placeholder text box, enter "content", which corresponds to the key value of the Placeholder we added on HomeLayout.aspx. Click Select once your screen looks like this.


Now we will add the custom control we created.

Click the Add button. Navigate to the Sublayouts/MySitecore/Controls folder and select the CurrentTime control. For the Placeholder text box, enter "/content/leftcolumn", which corresponds to the key value of the Placeholder in the TwoColumn.ascx sublayout when it exists within the "content" Placeholder of the HomeLayout.aspx layout. Click Select when your screen looks like this.


Now click OK to close the Device Editor and OK to close the Layout Details.

Save your page, then click on Publish in the top menu, then Preview. If everything went well, your page should look like this.


Since this is a two column layout, let's add a control to the other column to make sure our sublayout is behaving as we'd expect. 

Go back to the Device Editor and add another CurrentTime control, but this time, add it to "/content/rightcolumn".

Save your page, then refresh the preview. Your page should now look like this.


Extending our Solution


Now that we have a working sublayout and a basic control, we can try something a little more advanced.

Although the sample page that comes with Sitecore includes an XSL rendering, it would be more beneficial to us if that were a user control. This would allow us to leverage the rich .NET libraries rather than working only with XSL.

To start, we're going to need some new fields on our page template. Browse to the Page Template at Templates/MySitecore/Page Templates/Home Page, which we created in Part 1 of this series.

On the Builder tab, add a new Section, Page Details. Now add a Banner field that is of type Image, and a Title field that is of type Single-Line Text.

Your Page Template should now look like this. Save your changes.


Browse to the My Home item in the content tree and set the Title field. You can leave the Banner field empty for now.


Next we'll tell Sitecore about our new control. We'll follow the same process we did for adding the CurrentTime control to the content tree. Remember to add your new control to the /Layout/Sublayouts/MySitecore/Controls node in the content tree.

Name the new control "Header", then set your location to Sublayouts/MySitecore/Controls and your file location to Website/layouts/MySitecore/Controls. Click Create.

Your content tree should look like this now:


Remember to delete the file that was created by Sitecore from the file system. It should be located at C:\inetpub\wwwroot\[Sitecore Instance]\Website\layouts\MySitecore\Controls\Header.ascx

Now we'll create a new control in Visual Studio in the /layouts/MySitecore/Controls folder and name it Header.ascx. Edit the file to look like this:


If you try to compile now, you'll get an error because you are using some Sitecore controls in your new ascx. Add a reference to Sitecore.Kernel.dll, which is located in the C:\inetpub\wwwroot\[Sitecore Instance]\Website\bin folder.


Build the solution and then Publish it.

Testing the Header Control


Now we have a header control, but we need to add it to our page so we can see the results.

Go to the content/My Home node that corresponds to our custom page. Click on the Presentation tab in the top menu, then the Details button.

Click edit under the Default device and then click on the Controls tab to the left.

Click the Add button. Navigate to the Sublayouts/MySitecore/Sublayouts folder and select the TwoColumn sublayout. For the Placeholder text box, enter "pageheader", which corresponds to the key value of the Placeholder we added on HomeLayout.aspx. Click Select once your screen looks like this.


Now click OK to close the Device Editor and OK to close the Layout Details.

Save your page, then click on Publish in the top menu, then Preview. If everything went well, your page should look like this.


As a final exercise for the reader, edit the My Home page and set the Banner property. You can select the banner that is included with the sample page or upload one of your own in the Media Library. After you publish you should see that the sc:Image control you put in Header.ascx will read the Banner property on My Home and display the corresponding image on the page.

Summary

In this post, we added support for Twitter Bootstrap as our UI framework. We then added a sublayout to allow flexibility in how content is presented to users. Finally, we added two new user controls that provide custom functionality.

Beginning Sitecore Development, Part 2 - Building a Visual Studio Project

Overview

This is part 2 of a series of posts on Beginning Sitecore Development in Sitecore 8. If you want a little background on how all of the moving parts work together to display a web page to a user, check out the the first post in the series, Beginning Sitecore Development, Part 1 - Dissecting the out of the box Sitecore Home page.

Please note that since this is begginners' series, it is a built in an incremental fashion. As such, while later posts may cover MVC or TDS, this post will be based on using ASP.NET Web Forms and uses Visual Studio publishing.

Goals


In this post, we're going to create a new layout. We will create all of the items needed in the Sitecore content tree, as well as the corresponding files that will be manged by Visual Studio and deployed to the file system.

Setting up the Visual Studio solution


The first step is to set up a base solution in Visual Studio that we will use to hold all of our Sitecore related files that are custom to us.

Open Visual Studio 2013 and select File > New Project. In the dialog box, set the target framework to 4.51, and select the ASP.NET Web Application template. Note that we are using 4.51 because we are building a solution for Sitecore 8. If you are using an earlier version of Sitecore, make sure you pick the appropriate target framework.


On the next screen, select the Empty template, but make sure to check the box to include references for Web Forms.


Once your project is created, you'll want to clean up the extra items we don't need. Remove the App_Data, Models and Global.asax items from the solution. In addition, copy the Web.config from your Sitecore instance over the one that Visual Studio created. The web.config should be located at C:\inetpub\wwwroot\[SitecoreInstance]\Website\web.config.


Now we need to create a folder structure to manage our files. Let's create an assets folder first. We'll use this to store any static files like styles sheets or images that aren't stored in Sitecore. 

As a rule of thumb, it's always a good idea to create a folder that matches the name of your site or solution under the root Sitecore folders. This helps organize files if you have multiple sites or projects you'd like to manage. In addition to the assets folder, create a layouts folder as well. 

Once you are done, your solution should look like this.


Now let's create a layout. Right click on the layouts\MySitecore\Layouts folder and add a new item. Select the Web Form template, give it an appropriate name, and click Add.


Here you can see what the file looks like after Visual Studio creates it. This would be fine in a standalone web forms application, but for Sitecore, we need to add just a little more to it.


Let's copy some of the entries we found in the Sample Layout that comes with Sitecore. If you recall, that file is located at C:\inetpub\wwwroot\[SitecoreInstance]\Website\layouts\Sample layout.aspx. The content we want to add is highlighted below.

We'll start by adding some page directives. We'll use a Register directive so we can leverage Sitecore controls. In addition, the OutputCache directive will instruct Sitecore how we want to cache our page.

We'll add a Sitecore control for tracking our user and then we can add the content we want to display. In this first pass, we won't add any placeholders. We want to focus on getting all of the plumbing in place between Sitecore and Visual Studio first. We can add functionality afterwards.


Here is the current state of our Visual Studio project. You can see that we have some basic organization, but just one file to deploy - HomeLayout.aspx.


In order to deploy our solution, we need to set up a Publishing Profile. Before you go through this, make sure you have copied the web.config from your Sitecore instance into Visual Studio. If you miss this step, you will wipe out your web.config!

Start by right-clicking your project and selecting Publish. You'll be shown a dialog prompting you to select a publishing target. Click on Custom.


A dialog box will prompt you to name your profile. As a general rule, you'll want your Profile name to match your solution and/or your Sitecore instance name. But use whatever you feel is appropriate. Click OK.


On the Connection screen, change the Publish method to File System and then set the Target location to your Sitecore instance. Make sure you are pointing at the Website folder. Click Next.


On the settings tab, set your Configuration to Debug for now. This will help you during development so you can attach a debugger to your website. Make sure all of the File Publish Options are unchecked and then click Next.


Your Publishing profile is now configured. Click Publish to push out the HomeLayout.aspx file, your web.config, and your project assembly.


Verify that your HomeLayout.aspx file has been deployed to the file system. It will be located at C:\inetpub\wwwroot\[SitecoreInstance]\Website\layouts\MySitecore\HomeLayout.aspx. Go ahead and delete the file for now. Don't worry, it will get updated the next time we publish.

Create the Layout in Sitecore


Now you have a layout that IIS can see, but you need to tell Sitecore about it. Open up the Content Editor and browse to the Layout\Layouts node. Click on the Layout Folder button or right-click on the Layouts node to insert a new Layout Folder.


Just like in Visual Studio, we want to create a folder to group all of our files together within each Sitecore node. Name the new Layout Folder the same as you did in Visual Studio. Click OK.


Now that we have a folder, click on it and then the Layout button or right-click on your folder and insert a new Layout. We want the name for the Layout to be the same in Sitecore and in Visual Studio, so let's name the new layout HomeLayout. Click Next.


Place the layout under our custom Layout Folder by selecting it and then clicking Next.


Now you need to set where the layout will be deployed to the file system. Expand the layouts folder and you should see the folders you created in Visual Studio earlier, assuming you have published. 

If you skipped the publishing step, when you expand the layouts folder, your custom folders will not be displayed. You can also create these folders manually on the file system if you skipped publishing, but you'll have to restart the layout wizard.


Now click Create.

If you ran a Visual Studio publish earlier, but did NOT delete the HomeLayout.aspx, you'll get a warning here. Go ahead and delete the file from the file system and click Create again. The wizard will complete and you'll see that Sitecore places a HomeLayout.aspx file there for you.


Here's the state of the content tree after adding our layout:


Now Sitecore knows about our HomeLayout, and so does Visual Studio, but we lost our version of HomeLayout.aspx when we were forced to delete it. Let's remedy that by running a Publish from Visual Studio again to make sure the correct files are known to IIS.

Creating the Page Template


Now that we have a layout, we need to create a page that uses that layout. We'll start by defining the page template.

In Content Editor, select the Templates node. Now right-click on the Templates node and select Template Folder.


We'll keep our convention of defining folders for our project and name the new Template Folder accordingly. Click OK.


Since we will be adding more data templates later, it's a good idea to organize this area of the content tree based on how the data templates are used. This keeps your folder from being filled with lots of unrelated types of templates.

With the MySitecore template folder selected, click the Template Folder button or right-click and insert a Template Folder. Name this one Page Templates. 


With the Page Templates folder selected, click the New Template button or right-click and insert a New Template. Select a friendly name that corresponds to your layout, but leave the base template at the default setting. Click Next.


Confirm the location for the template and then click Next.


The wizard should complete. Click Close.


Just to clean things up a bit, we'll also set an icon for our new Home Page template. Select the item in the content tree, then click on the Configure menu at the top. You'll see an Icon button in the ribbon. Click that.


Pick whatever Icon you'd like, then click the Save button in the ribbon.

Creating the Page


Now that we have a Page Template, we need to create a content item that uses that template. Right client the Content node and select Insert, Insert from template.


Select your new Page Template and give an appropriate Item Name, then click Insert.


Next we need to configure how this content item so it'll show on the website correctly. With your new page selected, click the Presentation tab in the top menu and then click Details.


Here you can see that no layout has been specified. Under the Default device, click Edit.


On the Layout tab, click the drop down and select our custom Page Layout. Click OK to close the Device Editor dialog.


Click OK to close the Layout Details dialog. Now click Save in the ribbon bar to save the changes we've made to the content item.

Now all of the pieces are wired up and it's time to see our page come to life. On the Publish tab, click the Preview button. 


A new window will open up and show our page.


Not very exciting so far, but now we have all of the pieces in place to start adding more feature-rich components to our site. 

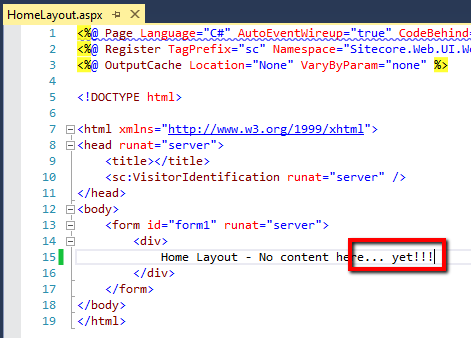
Just to prove that our Visual Studio project ties into our Sitecore instance, go back to Visual Studio and make a small edit to the HomeLayout.aspx.


Publish those changes with Visual Studio and then refresh your Sitecore preview. You should see the changes have carried over.


Summary


In this post, we created a Visual Studio project that will serve as the framework for building a custom Sitecore project. We then created the corresponding items in the Sitecore content tree. Finally, we demonstrated that our Visual Studio project could be used to control the presentation of Sitecore items.