Overview
This is part 3 of a series of posts on Beginning Sitecore Development in Sitecore 8. Knowledge of previous posts is assumed, so if you have trouble with any of the material here, you can refer back to the previous post at Beginning Sitecore Development, Part 2 - Building a Visual Studio Project.
Goals
In this post, we're going to extend our existing solution to add styling with Twitter Bootstrap 3.32. In addition, we'll add a sublayout so our editors will have flexibility in how they layout content. Finally, we'll add some custom controls to present content in a specific format to our users.
Adding support for Bootstrap
Our existing Visual Studio project has some structure already, but it could use a little more organization to support the new additions we plan to make.
Here's the current layout of the solution.

Let's add a vendor subfolder to assets/MySitecore so we don't have to split up any 3rd party frameworks that might have their own asset folders.
Now download Bootstrap and unzip it to the assets/Mysitecore/vendor folder. Then add the Bootstrap files to your solution by setting your project to show all files and then including the folder. Your solution should now look like this:
When you are done, your solution should look like this:

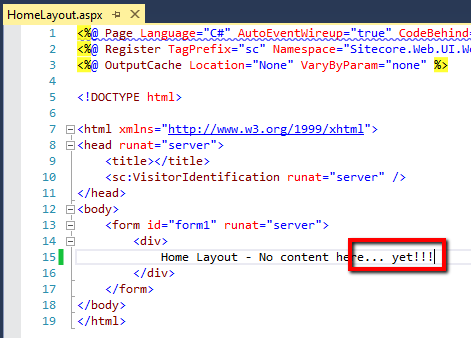
With the Bootstrap files now available, let's update our HomeLayout to reference the appropriate styles and scripts, using relative paths. Let's also make a quick update to the content of our page to verify if Bootstrap is working correctly.

With all the proper hooks in place, it's time to test it out. Build and Publish in Visual Studio. Then go into Sitecore and preview your page again. You should see it is now leveraging Bootstrap.

Creating Sublayouts for Different Page Configurations
Now that we've got Bootstrap support, it'd be really great if we could offer several different configurations of the page. Let's create some sublayouts that support different column configurations.
Let's start by updating our layout page. We'll remove all of the Bootstrap test content we created and instead add Placeholders that represent the areas of the layout where a content editor can add sublayouts, controls, or renderings. We'll also add a hook for a new style sheet.
Here's our updated HomeLayout.aspx.

Let's go ahead and create our new stylesheet we just referenced. Create mysitecore.css under the assets/MySitecore/styles folder. Here we've set it up to contain some base styles we'll use with our sublayouts.

We'll now create a sublayout that provides for a two column configuration. Add a new control to the layouts/MySitecore/Sublayouts folder in Visual Studio named TwoColumn.ascx.

Our Visual Studio project should now look like this:

Open TwoColumn.ascx and add the Bootstrap styles to divide the page into two columns. Make sure to add Sitecore Placeholder controls so the content editors can organize content they add.

Go ahead and publish your solution.
Now we need to tell Sitecore about our new Sublayout. Find the /Layout/Sublayouts node in the content tree and then create a new Sublayout Folder named MySitecore. Create another Sublayout Folder inside of that one named Sublayouts.

Right click that folder and add a new Sublayout named TwoColumn and click Next

Place it in the appropriate location.

Select the file location that corresponds to our Visual Studio project.
Note that we have the usual chicken-and-egg problem where Sitecore wants to provision a file that we want to publish with Visual Studio. If you did the step in Sitecore first, you'd be missing the new folder structure. However, if you did the step in Visual Studio first, the file will already be there and Sitecore will be unhappy.
Just delete the file you already published at C:\inetpub\wwwroot\[Sitecore Instance]\Website\layouts\MySitecore\Sublayouts\TwoColumn.ascx, and click Create on the Sitecore wizard. This will create the Sitecore default version of the file. Then go back into Visual Studio and republish to get our customized version.
Creating a Custom Control
In order to test our Sublayout, we need something to put in it. We'll go ahead and create a very basic user control for this purpose.
Start by adding a new Web Forms User Control to the layouts/MySitecore/Controls folder in Visual Studio named CurrentTime.ascx.
Add a label to the user control that we can store the time in. Here's our file with the markup added.
Now add the code to store the current time in the label. Here's our code behind.

Go ahead and publish your solution.
Now we need to tell Sitecore about our new control. Find the /Layout/Sublayouts/MySitecore node in the content tree and then create a new Sublayout Folder named Controls. It should look like this now.

Right click that folder and add a new Sublayout named CurrentTime and click Next.

Place it in the appropriate location.

Select the file location that corresponds to our Visual Studio project.

Yet again, we get our chicken and egg problem. Delete the C:\inetpub\wwwroot\[Sitecore Instance]\Website\layouts\MySitecore\Controls\CurrentTime.ascx file and click Create.
Your content tree should now look like this, with a CurrentTime control and a TwoColumn sublayout.

Republish your Visual Studio solution.
Testing the SubLayout and Control
Go to the content/My Home node that corresponds to our custom page. Click on the Presentation tab in the top menu, then the Details button.
Click edit under the Default device and then click on the Controls tab to the left.
Click the Add button. Navigate to the Sublayouts/MySitecore/Sublayouts folder and select the TwoColumn sublayout. For the Placeholder text box, enter "content", which corresponds to the key value of the Placeholder we added on HomeLayout.aspx. Click Select once your screen looks like this.

Now we will add the custom control we created.
Click the Add button. Navigate to the Sublayouts/MySitecore/Controls folder and select the CurrentTime control. For the Placeholder text box, enter "/content/leftcolumn", which corresponds to the key value of the Placeholder in the TwoColumn.ascx sublayout when it exists within the "content" Placeholder of the HomeLayout.aspx layout. Click Select when your screen looks like this.

Now click OK to close the Device Editor and OK to close the Layout Details.
Save your page, then click on Publish in the top menu, then Preview. If everything went well, your page should look like this.

Since this is a two column layout, let's add a control to the other column to make sure our sublayout is behaving as we'd expect.
Go back to the Device Editor and add another CurrentTime control, but this time, add it to "/content/rightcolumn".
Save your page, then refresh the preview. Your page should now look like this.

Extending our Solution
Now that we have a working sublayout and a basic control, we can try something a little more advanced.
Although the sample page that comes with Sitecore includes an XSL rendering, it would be more beneficial to us if that were a user control. This would allow us to leverage the rich .NET libraries rather than working only with XSL.
To start, we're going to need some new fields on our page template. Browse to the Page Template at Templates/MySitecore/Page Templates/Home Page, which we created in Part 1 of this series.
On the Builder tab, add a new Section, Page Details. Now add a Banner field that is of type Image, and a Title field that is of type Single-Line Text.
Your Page Template should now look like this. Save your changes.

Browse to the My Home item in the content tree and set the Title field. You can leave the Banner field empty for now.

Next we'll tell Sitecore about our new control. We'll follow the same process we did for adding the CurrentTime control to the content tree. Remember to add your new control to the /Layout/Sublayouts/MySitecore/Controls node in the content tree.
Name the new control "Header", then set your location to Sublayouts/MySitecore/Controls and your file location to Website/layouts/MySitecore/Controls. Click Create.
Your content tree should look like this now:

Remember to delete the file that was created by Sitecore from the file system. It should be located at C:\inetpub\wwwroot\[Sitecore Instance]\Website\layouts\MySitecore\Controls\Header.ascx
Name the new control "Header", then set your location to Sublayouts/MySitecore/Controls and your file location to Website/layouts/MySitecore/Controls. Click Create.
Your content tree should look like this now:
Remember to delete the file that was created by Sitecore from the file system. It should be located at C:\inetpub\wwwroot\[Sitecore Instance]\Website\layouts\MySitecore\Controls\Header.ascx
Now we'll create a new control in Visual Studio in the /layouts/MySitecore/Controls folder and name it Header.ascx. Edit the file to look like this:

If you try to compile now, you'll get an error because you are using some Sitecore controls in your new ascx. Add a reference to Sitecore.Kernel.dll, which is located in the C:\inetpub\wwwroot\[Sitecore Instance]\Website\bin folder.

Build the solution and then Publish it.
Now we have a header control, but we need to add it to our page so we can see the results.
Click the Add button. Navigate to the Sublayouts/MySitecore/Sublayouts folder and select the TwoColumn sublayout. For the Placeholder text box, enter "pageheader", which corresponds to the key value of the Placeholder we added on HomeLayout.aspx. Click Select once your screen looks like this.

Testing the Header Control
Now we have a header control, but we need to add it to our page so we can see the results.
Go to the content/My Home node that corresponds to our custom page. Click on the Presentation tab in the top menu, then the Details button.
Click edit under the Default device and then click on the Controls tab to the left.
Click the Add button. Navigate to the Sublayouts/MySitecore/Sublayouts folder and select the TwoColumn sublayout. For the Placeholder text box, enter "pageheader", which corresponds to the key value of the Placeholder we added on HomeLayout.aspx. Click Select once your screen looks like this.
Now click OK to close the Device Editor and OK to close the Layout Details.
Save your page, then click on Publish in the top menu, then Preview. If everything went well, your page should look like this.

As a final exercise for the reader, edit the My Home page and set the Banner property. You can select the banner that is included with the sample page or upload one of your own in the Media Library. After you publish you should see that the sc:Image control you put in Header.ascx will read the Banner property on My Home and display the corresponding image on the page.
As a final exercise for the reader, edit the My Home page and set the Banner property. You can select the banner that is included with the sample page or upload one of your own in the Media Library. After you publish you should see that the sc:Image control you put in Header.ascx will read the Banner property on My Home and display the corresponding image on the page.